Integrate Spring boot with Keycloak – Example
What is Keycloak?
An open source identity and access management tool called Keycloak primarily targets software and services. For the purpose of protecting our apps, Keycloak serves as an authentication and authorization server. Protocols including OAuth2.0, OpenID Connect, and SAML are supported by Keycloak. Single-Sign-On (SSO), Identity Brokering, Social Login, User Federation, and more functionalities are offered by Keycloak.
for more information kindly refer keycloak.org.
In this tutorial, we’ll build a spring boot application and use Keycloak to secure it.
We will first download Keycloak and launch the server.
Step 1:
Go to keycloak and download the latest version.
Step 2:
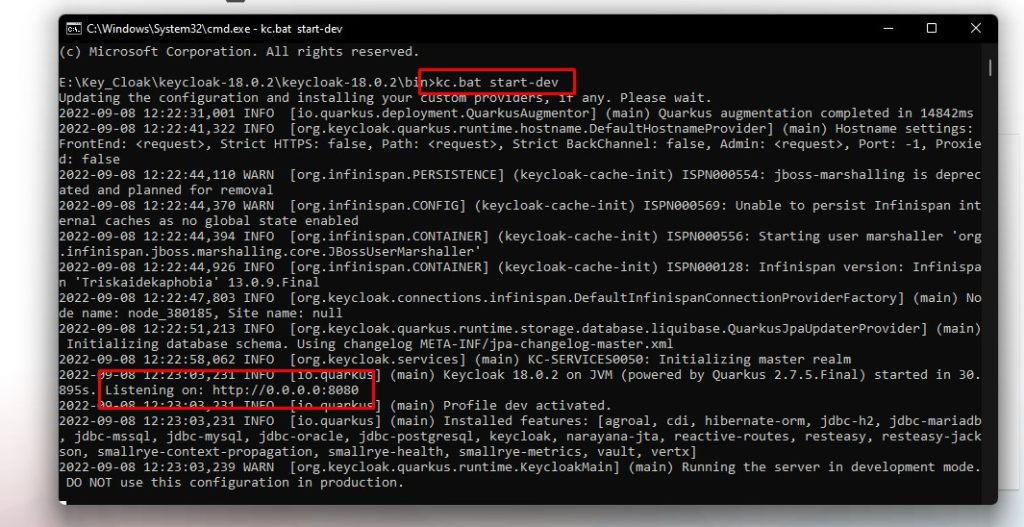
Open command prompt, navigate to bin folder in keycloak and use the below command to start keycloak server,
- kc.bat start-dev
Step 3:
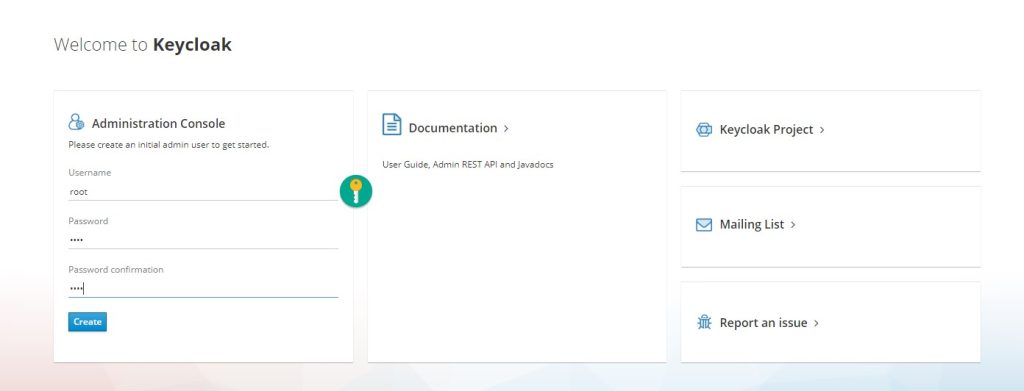
In browser, type localhost:8080 which will bring the keycloak screen and create administrator user.
Step 4:
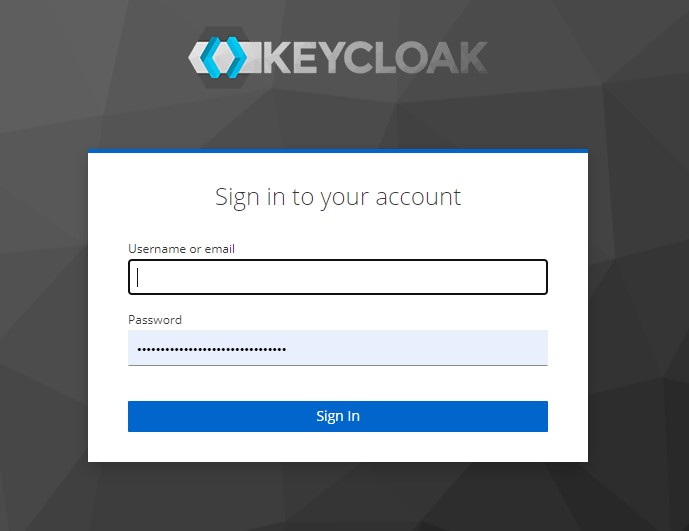
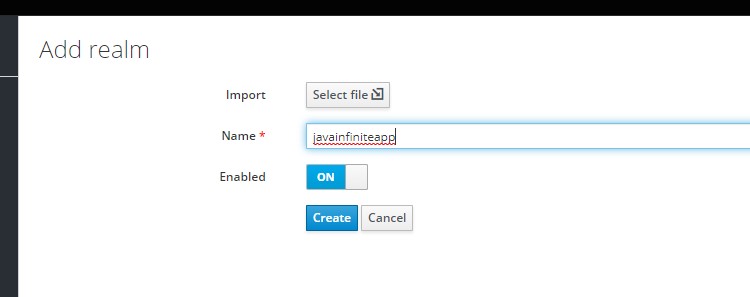
Login as admin user and create a realm (default realm is Master)

Step 5:
Now let us create a client, spring boot identifies which application to be connected based on client id.

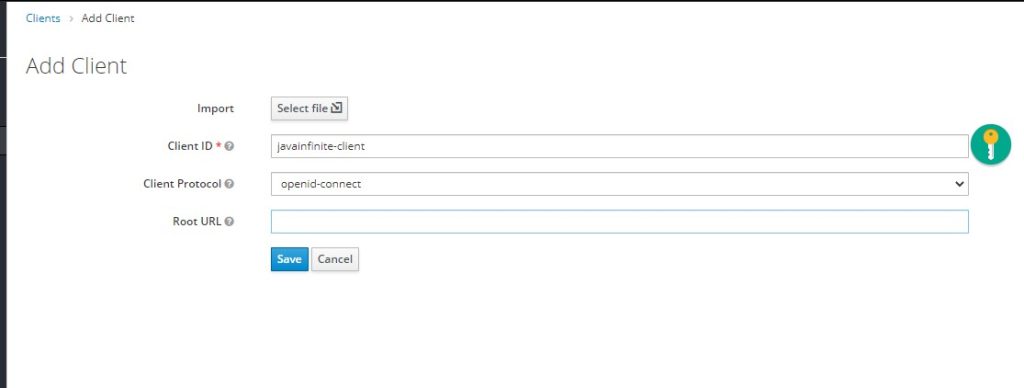
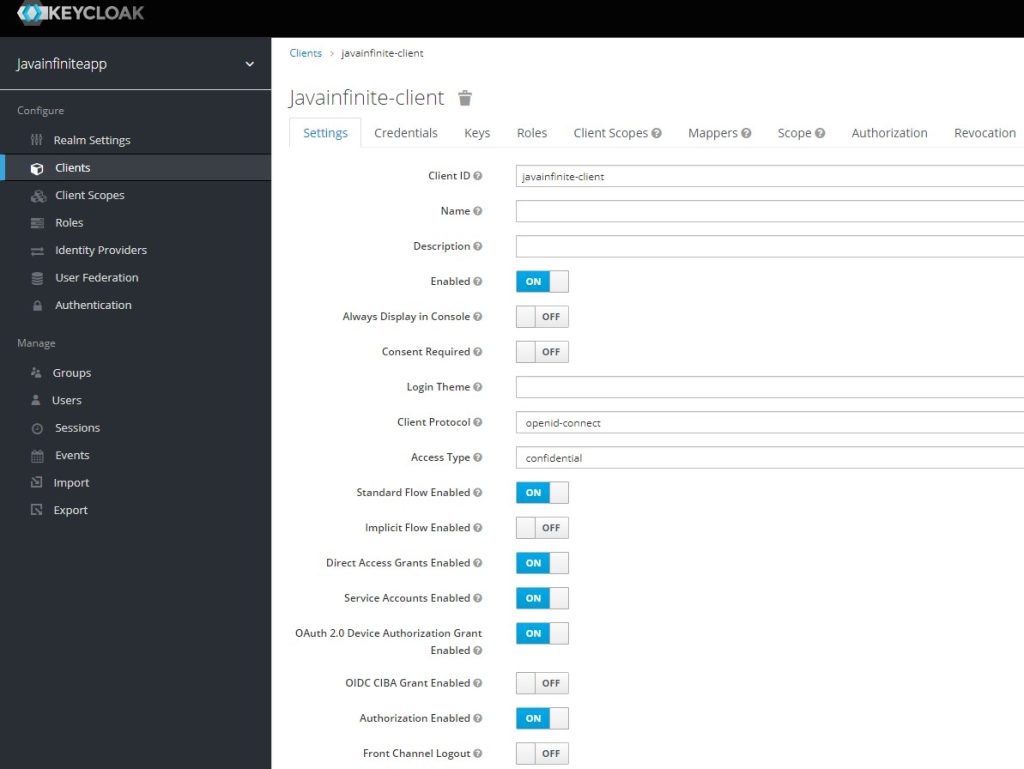
Step 6:
Set redirect_uri,
This is a mandatory field for the client, here we will set the URI with server and port of our spring boot application
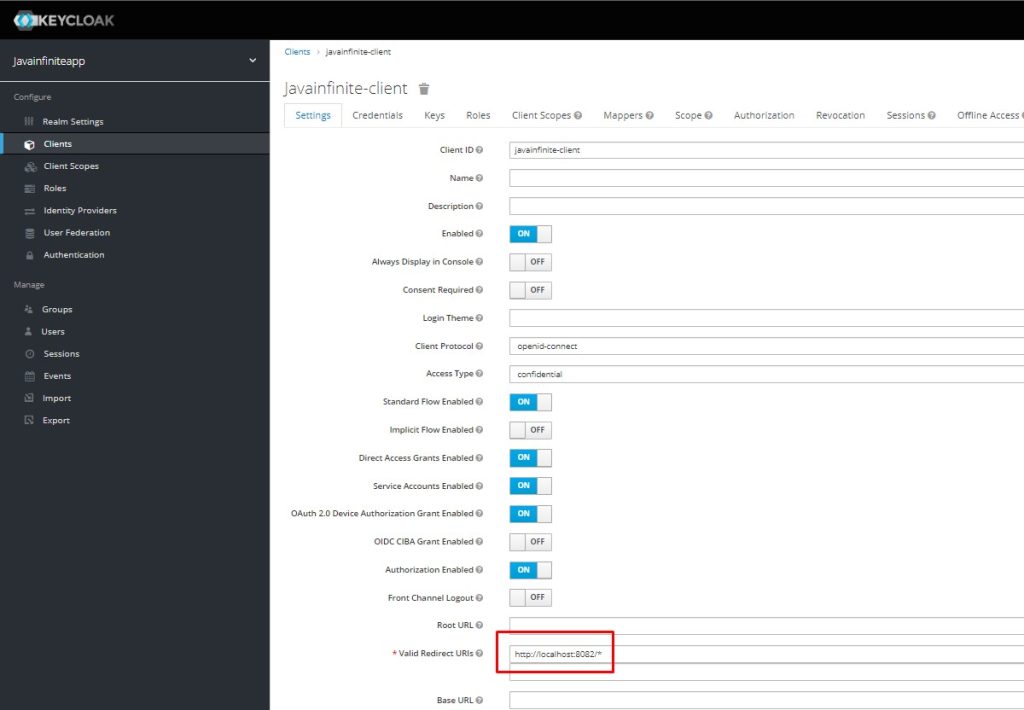
Step 7:
Create a role for the client-id, javainfinite-client.

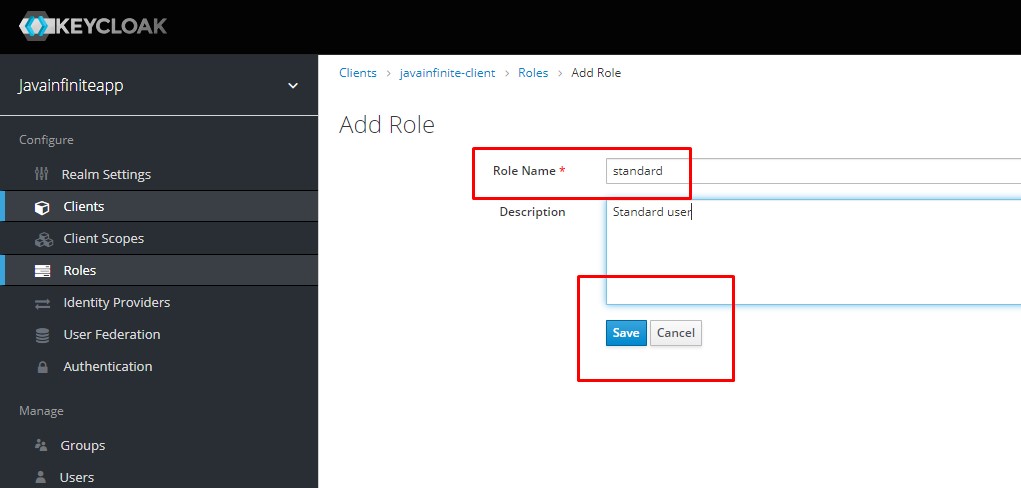
Step 8:
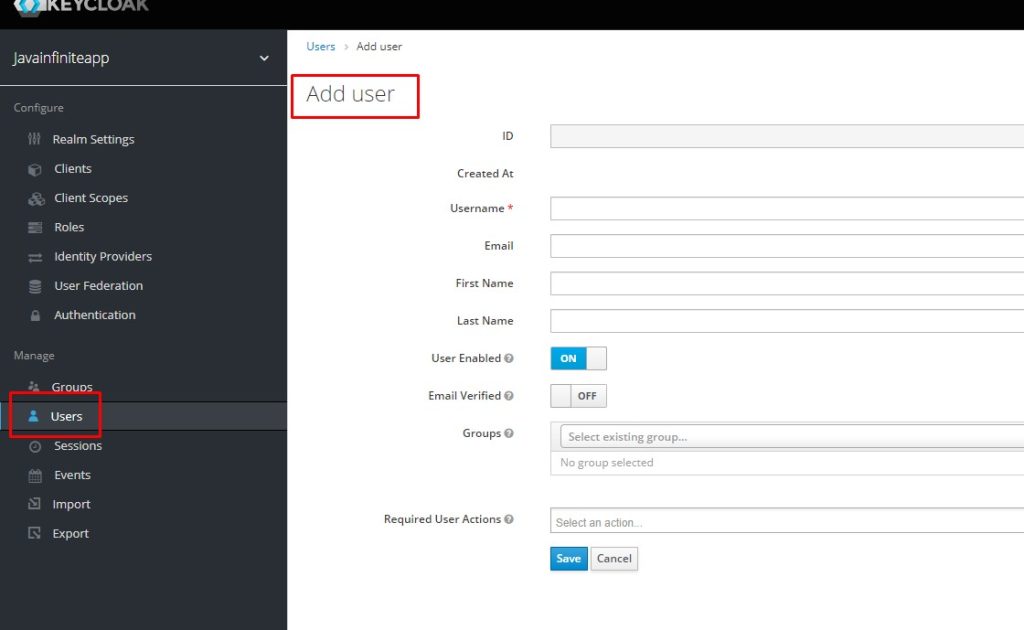
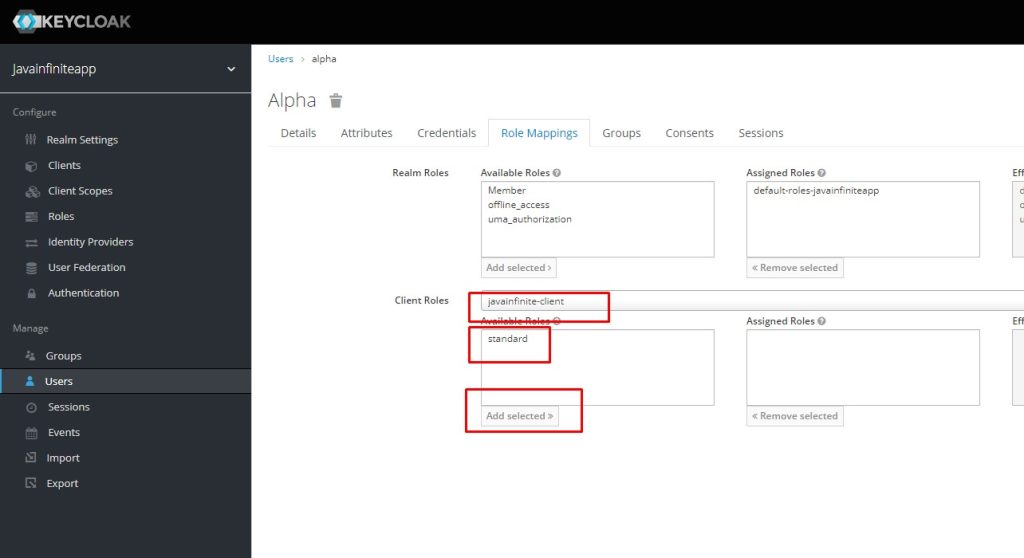
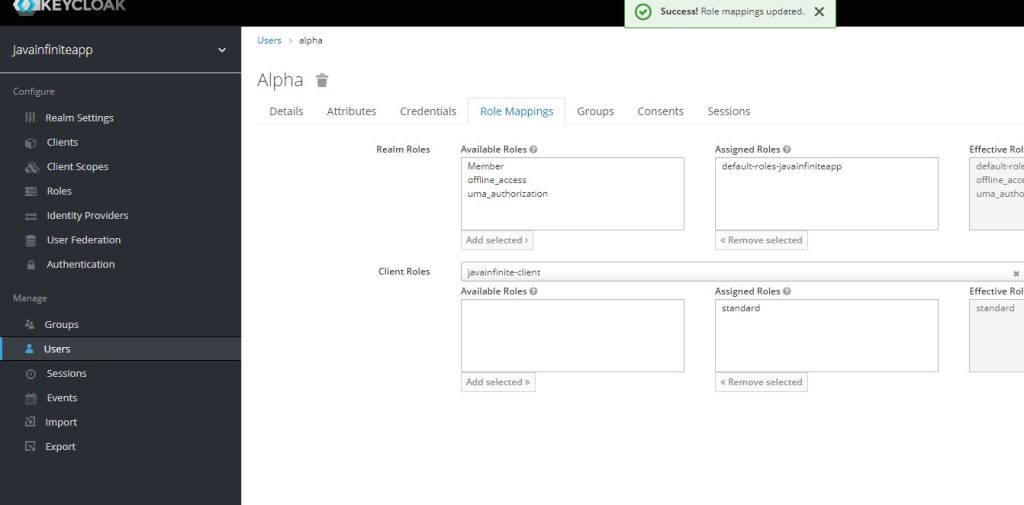
Create a user and map this standard role to the user.
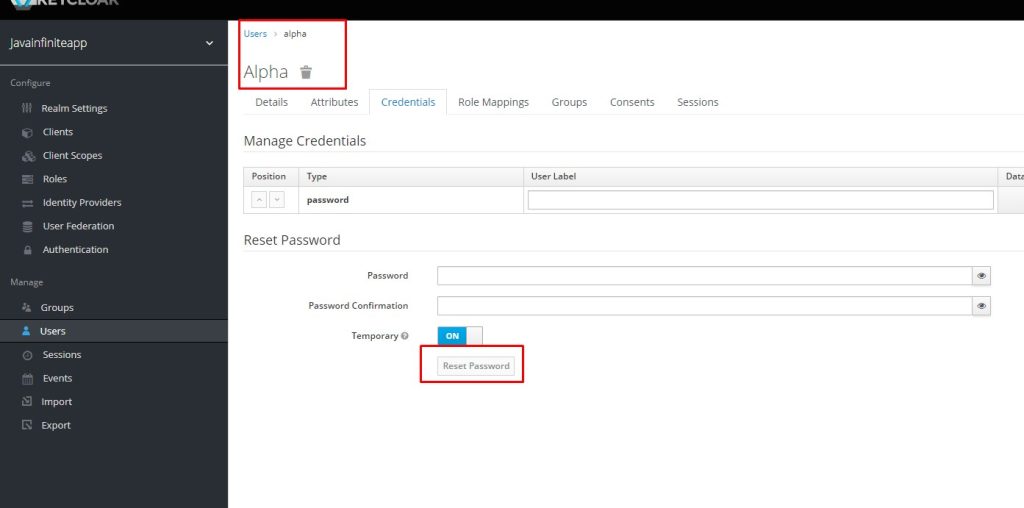
After creating the user, set default credentials for that user,
Now let us create our Spring boot application,
Spring Boot Application:
Project Structure:

pom.xml
<?xml version="1.0" encoding="UTF-8"?>
<project xmlns="http://maven.apache.org/POM/4.0.0" xmlns:xsi="http://www.w3.org/2001/XMLSchema-instance"
	xsi:schemaLocation="http://maven.apache.org/POM/4.0.0 https://maven.apache.org/xsd/maven-4.0.0.xsd">
	<modelVersion>4.0.0</modelVersion>
	<parent>
		<groupId>org.springframework.boot</groupId>
		<artifactId>spring-boot-starter-parent</artifactId>
		<version>2.7.3</version>
		<relativePath/> <!-- lookup parent from repository -->
	</parent>
	<groupId>com.javainfinite</groupId>
	<artifactId>keycloak</artifactId>
	<version>0.0.1-SNAPSHOT</version>
	<name>Keycloak Security</name>
	<description>KeyCloak Security Example</description>
	<properties>
		<java.version>17</java.version>
	</properties>
	<dependencies>
		<dependency>
			<groupId>org.springframework.boot</groupId>
			<artifactId>spring-boot-starter-security</artifactId>
		</dependency>
		<dependency>
			<groupId>org.springframework.boot</groupId>
			<artifactId>spring-boot-starter-web</artifactId>
		</dependency>
		<!-- https://mvnrepository.com/artifact/org.keycloak/keycloak-spring-boot-starter -->
		<dependency>
			<groupId>org.keycloak</groupId>
			<artifactId>keycloak-spring-boot-starter</artifactId>
			<version>15.0.2</version>
		</dependency>
	</dependencies>

	<build>
		<plugins>
			<plugin>
				<groupId>org.springframework.boot</groupId>
				<artifactId>spring-boot-maven-plugin</artifactId>
			</plugin>
		</plugins>
	</build>

</project>
application.properties:
keycloak.realm=javainfiniteapp
keycloak.auth-server-url=http://localhost:8080
keycloak.resource=javainfinite-client
keycloak.credentials.secret=Afg7GGxqXXRg0tEJq6XCyfFP3RJ0dREO
keycloak.use-resource-role-mappings=true
server.port=8082
- Realm is the realm name which we created in Keycloak
- Auth-server-url is the url in which our keycloak server runs
- resource is our client-id, javainfinite-client
- credentials.secret, this can be found at

- use-resource-role-mapping to enable role based mappings.
KeycloakController.java
package com.javainfinite.keycloack.controller;

import org.keycloak.adapters.springsecurity.token.KeycloakAuthenticationToken;
import org.keycloak.representations.AccessToken;
import org.springframework.web.bind.annotation.GetMapping;
import org.springframework.web.bind.annotation.RestController;

import java.security.Principal;

@RestController
public class KeycloakController {

    @GetMapping("/login")
    public String login() {
        return "Welcome to login screen";
    }

    @GetMapping("/homepage")
    public String homepage(Principal principal) {
        KeycloakAuthenticationToken token = (KeycloakAuthenticationToken) principal;
        AccessToken accessToken = token.getAccount().getKeycloakSecurityContext().getToken();
        return "Welcome to homepage, " +accessToken.getPreferredUsername()+" successfully logged in";
    }
}
We will make login page accessible for everyone without authentication and homepage requires authentication and authorization.
We have used Keycloak authentication token to read the username from keycloak and display the name.
KeycloakSecurity.java
package com.javainfinite.keycloack.security;

import org.keycloak.adapters.springsecurity.KeycloakConfiguration;
import org.keycloak.adapters.springsecurity.authentication.KeycloakAuthenticationProvider;
import org.keycloak.adapters.springsecurity.config.KeycloakWebSecurityConfigurerAdapter;
import org.springframework.beans.factory.annotation.Autowired;
import org.springframework.context.annotation.Bean;
import org.springframework.security.config.annotation.authentication.builders.AuthenticationManagerBuilder;
import org.springframework.security.config.annotation.web.builders.HttpSecurity;
import org.springframework.security.core.authority.mapping.SimpleAuthorityMapper;
import org.springframework.security.core.session.SessionRegistryImpl;
import org.springframework.security.web.authentication.session.RegisterSessionAuthenticationStrategy;
import org.springframework.security.web.authentication.session.SessionAuthenticationStrategy;

@KeycloakConfiguration
public class KeycloakSecurity extends KeycloakWebSecurityConfigurerAdapter {

    @Bean
    @Override
    protected SessionAuthenticationStrategy sessionAuthenticationStrategy() {
        return new RegisterSessionAuthenticationStrategy(
                new SessionRegistryImpl());
    }

     @Override
    protected void configure(HttpSecurity http) throws Exception {
         super.configure(http);
        http.authorizeRequests()
                .antMatchers("/homepage").hasRole("standard")
                .anyRequest().permitAll();
        http.csrf().disable();
    }

    @Autowired
    public void configureGlobal(AuthenticationManagerBuilder auth) throws Exception {
        KeycloakAuthenticationProvider keycloakAuthenticationProvider = keycloakAuthenticationProvider();
        keycloakAuthenticationProvider.setGrantedAuthoritiesMapper(new SimpleAuthorityMapper());
        auth.authenticationProvider(keycloakAuthenticationProvider);
    }

}
Now let us understand the above security configuration class,
- @KeycloakConfiguration: It includes EnableWebSecurity and Configuration and provides Keycloak based configurations
- SessionAuthenticationStrategy:
- Allows pluggable support for HttpSession-related behaviour when an authentication occurs.
- Typical use would be to make sure a session exists or to change the session Id to guard against session-fixation attacks. for details click here
- ConfigureGlobal:
- Keycloak Authentication provider is included with authentication manager.
- In our Configure method, we have made homepage to be authenticated and authorized for the users with role – standard
All other requests will be accessible for all.
KeycloakConfigurationResolver.java:
package com.javainfinite.keycloack.security;

import org.keycloak.adapters.KeycloakConfigResolver;
import org.keycloak.adapters.springboot.KeycloakSpringBootConfigResolver;
import org.springframework.context.annotation.Bean;
import org.springframework.context.annotation.Configuration;

@Configuration
public class KeycloakConfigurationResolver {

    @Bean
    public KeycloakConfigResolver KeycloakConfigResolver() {
        return new KeycloakSpringBootConfigResolver();
    }
}
KeycloakConfigResolver: Keycloak will defer the resolution of a KeycloakDeployment to the target application at the request-phase.
Now let us run our springboot application,
package com.javainfinite.keycloack;

import org.springframework.boot.SpringApplication;
import org.springframework.boot.autoconfigure.SpringBootApplication;

@SpringBootApplication
public class KeycloakSecurityApplication {

	public static void main(String[] args) {
		SpringApplication.run(KeycloakSecurityApplication.class, args);
	}

}
Application started…
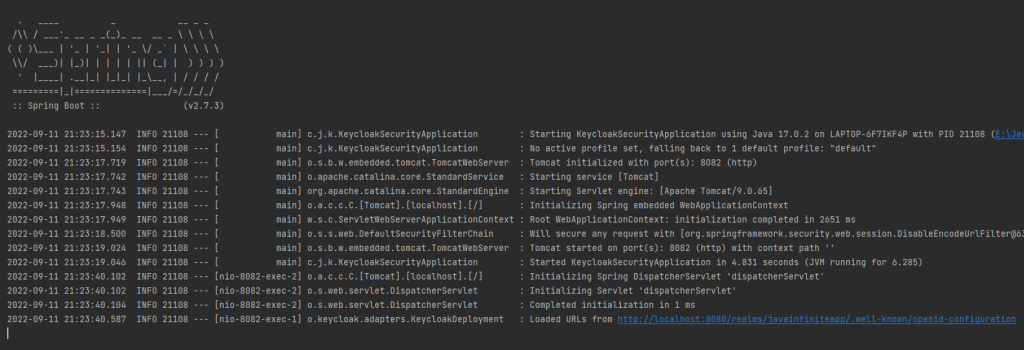
Now let us access the login screen,

Now let us try our homepage, which requires user to have role – standard and the user should be authenticated.
When we try localhost:8082/homepage it will automatically re-direct to login of keycloak,
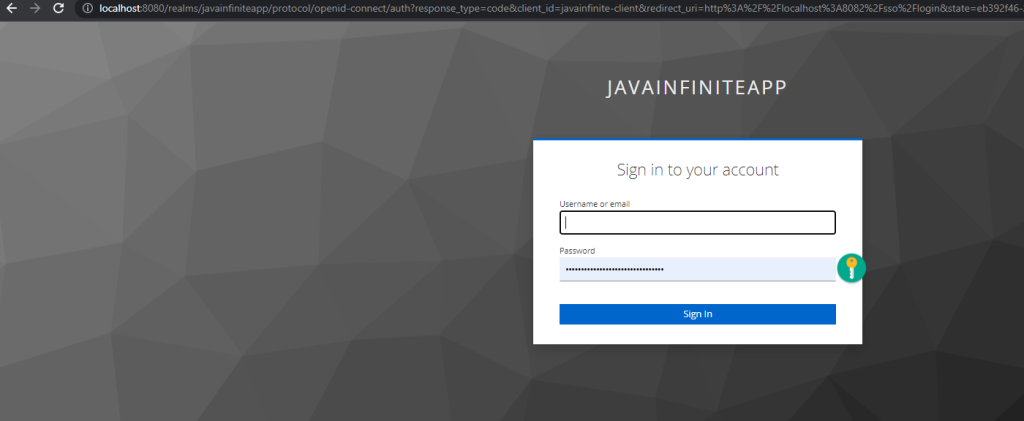
Once successfully logged in, we can see the message like below,

To verify whether the application works based on the role, let us go to our keycloak and remove the “standard” role for our user – alpha,

We have removed the role for the user alpha, when we try the homepage,

For any doubts or queries or needed help with implementing above example please do leave a comment.
Code can be downloaded here.


Thanks for great tutorial, can you also tell about log out using spring boot and keycloak
this tutorial is very usefull