
Dockerize SpringBoot Application
In this post, Lets us create a simple SpringBoot application – Hello World and dockerize and deploy the application as container.
What is Docker?
Docker is a tool which helps us to create, deploy and run applications by means of Containers. Containers are like a package which has all the dependencies and libraries which is required to run the application successfully.
Docker is a platform for deploying Microservices.
There are many commands used in dockers, but for our example purpose we are going to use only 2 commands.
Commands to build an image and deploy as container.
Creating Image:
docker image build -t “imagename” .
Deploying Container:
docker container run “imageid” –> Generated after image creation.
Note: Docker has to be installed for the below application to work.
Project Structure:

We are going to create a sample controller and main springboot class.
pom.xml
<?xml version="1.0" encoding="UTF-8"?>
<project xmlns="http://maven.apache.org/POM/4.0.0"
	xmlns:xsi="http://www.w3.org/2001/XMLSchema-instance"
	xsi:schemaLocation="http://maven.apache.org/POM/4.0.0 http://maven.apache.org/xsd/maven-4.0.0.xsd">
	<modelVersion>4.0.0</modelVersion>

	<groupId>springboot</groupId>
	<artifactId>docker</artifactId>
	<version>0.0.1-SNAPSHOT</version>
	<packaging>jar</packaging>


	<properties>
		<project.build.sourceEncoding>UTF-8</project.build.sourceEncoding>
		<java.version>1.8</java.version>
	</properties>

	<parent>
		<groupId>org.springframework.boot</groupId>
		<artifactId>spring-boot-starter-parent</artifactId>
		<version>1.5.10.RELEASE</version>
	</parent>
	<dependencies>
		<dependency>
			<groupId>org.springframework.boot</groupId>
			<artifactId>spring-boot-starter-web</artifactId>
		</dependency>
	</dependencies>

	<build>
		<plugins>
			<plugin>
				<groupId>org.apache.maven.plugins</groupId>
				<artifactId>maven-compiler-plugin</artifactId>
				<version>3.1</version>
				<configuration>
					<source>${java.version}</source>
					<target>${java.version}</target>
				</configuration>
			</plugin>
			<plugin>
				<groupId>org.springframework.boot</groupId>
				<artifactId>spring-boot-maven-plugin</artifactId>
			</plugin>
		</plugins>
	</build>
</project>
AppController.java
package com.javainfinite;

import org.springframework.web.bind.annotation.RequestMapping;
import org.springframework.web.bind.annotation.RestController;

@RestController
public class AppController {

	@RequestMapping(value="/docker")
	public String display() {
		return "Hello World!";
	}


}
App.java
@SpringBootApplication
public class App {
    public static void main(String[] args) {
        SpringApplication.run(App.class, args);
    }
}
Dockerfile:
FROM openjdk:8
EXPOSE 8080:8080
WORKDIR /usr/local/bin
COPY ./target/docker-0.0.1-SNAPSHOT.jar helloworld.jar
ENTRYPOINT [ "java", "-jar", "helloworld.jar"]
So what are we doing with Dockerfile?
FROM – used to pull an image, here were taking the latest of Ubuntu. Usually the pull is from dockerhub (DockerHub). There are many base images already available in dockerhub. Similar to ubuntu, there is alphine, openjdk etc. which can be pulled from dockerhub using FROM.
MAINTAINER: It is for our own purpose, including the name
EXPOSE: Exposing the port where 8080:8080. First 8080 is internal port where as second is external exposure
WORKDIR: Working directory inside the container.
COPY: This is where we copy our jar file which is available in Target folder to within docker container. Here i am copying to /usr/local/bin/
ENTRYPOINT: This is where we run our application, we usually run as java -jar sample.jar the same is used in entry point.
After this, we run mvn clean install.
So, How to create image from Dockerfile?
Before creating an image, if you are using OracleVM make sure the instance is running.
We are going to use command prompt.
Command to build image: docker image build -t “helloworld” .
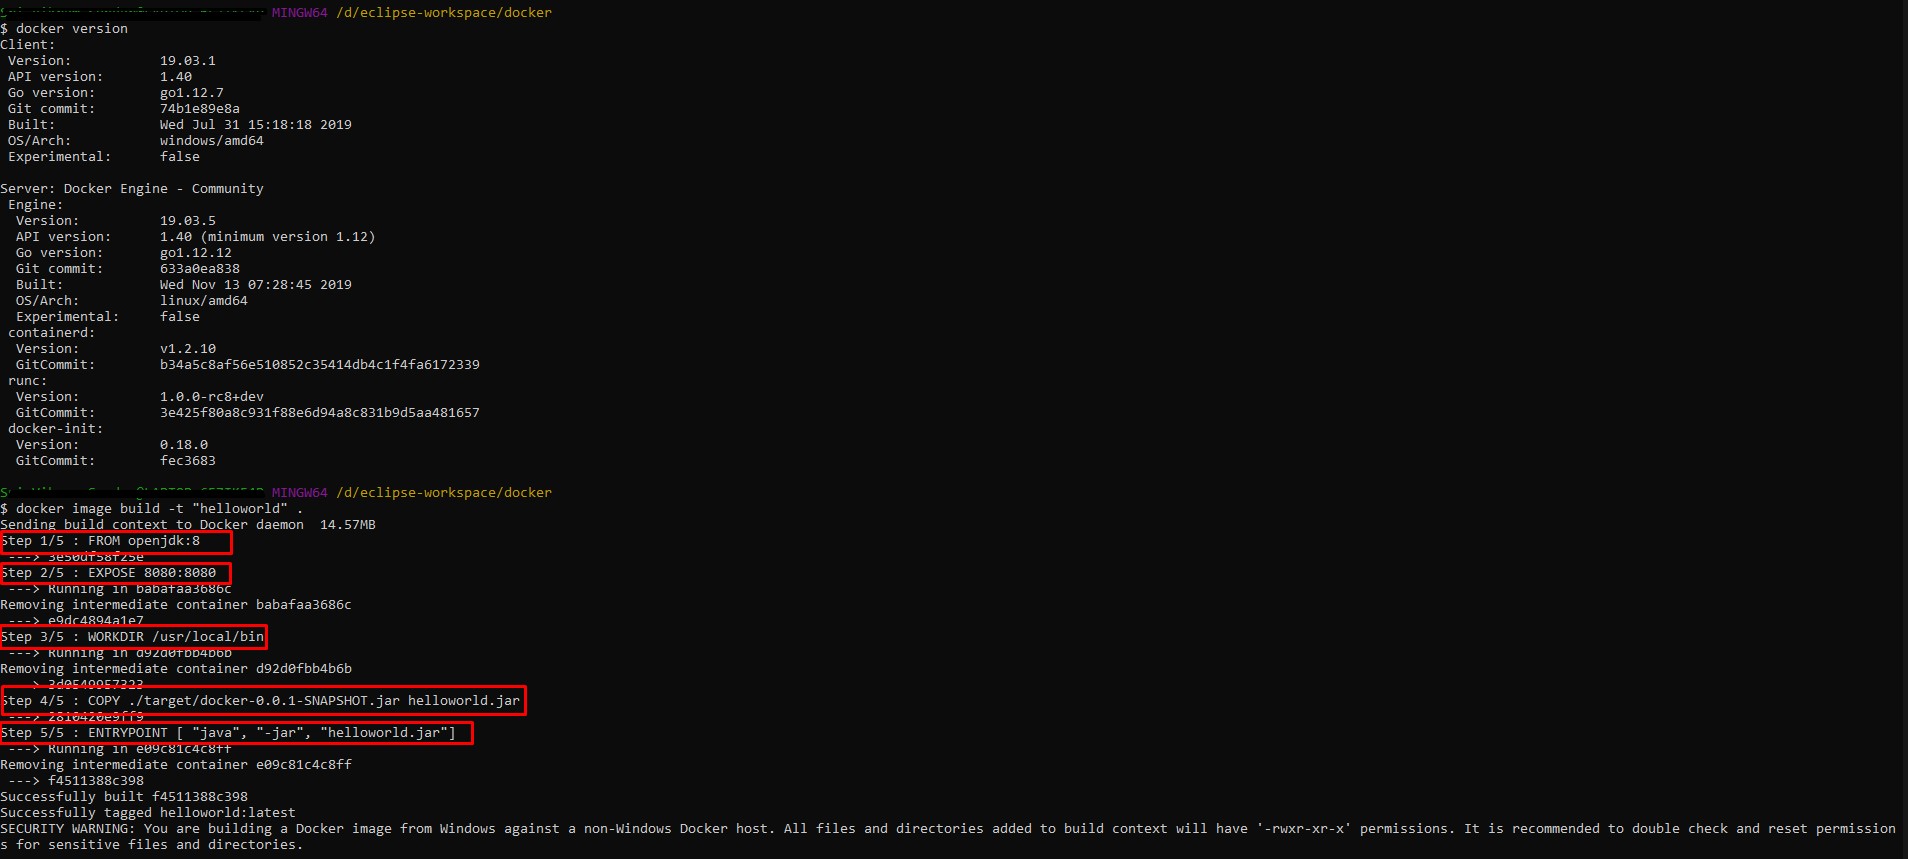
From the above the image has been created with our docker file.
Step 1: It has pulled openjdk:8 (FROM openjdk:8)
Step 2: Exposing the port 8080:8080 (EXPOSE 8080:8080)
Step 3: Work directory is set to the path (WORKDIR /usr/local/bin)
Step 4: Copied the jar from target folder to bin folder (COPY ./target/docker-0.0.1-SNAPSHOT.jar helloworld.jar)
Step 5: Entrypoint is executed.
Now we have created the image, now we can to deploy it as container.
we are going to use the command
docker run -p 8080:8080 “image name”
Here we are exposing the port and running that image as a container.

Here we have exposed the port 8080:8080 and started the container.
Now let us check the browser,
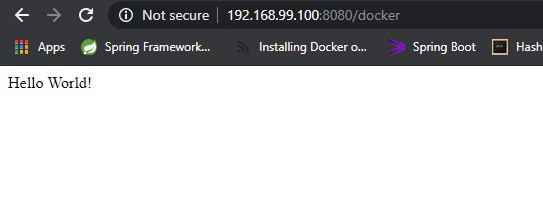
If noticed, we have used some kind of IP (192.168.99.100) and not Localhost. This is because we have deployed this as container in the docker. the docker machine will have an IP address.
So how to check the ip address,
docker-machine ip
This will give us the docker ip address,

Code can be downloaded at: Dockerize SpringBoot Application – Hello World Example
[…] our previous article, We learnt how to Dockerize SpringBoot Application with Simple Hello World example. In this post, let us see how can we push the image […]
[…] our previous posts, we have seen how to Dockerize SpringBoot Application (here) and How to pull and push images in Docker Hub […]